Showing posts with label Cake. Show all posts

Saturday, July 30, 2016

Cupcakes, Sprinkles, and Bacon, OH MY!

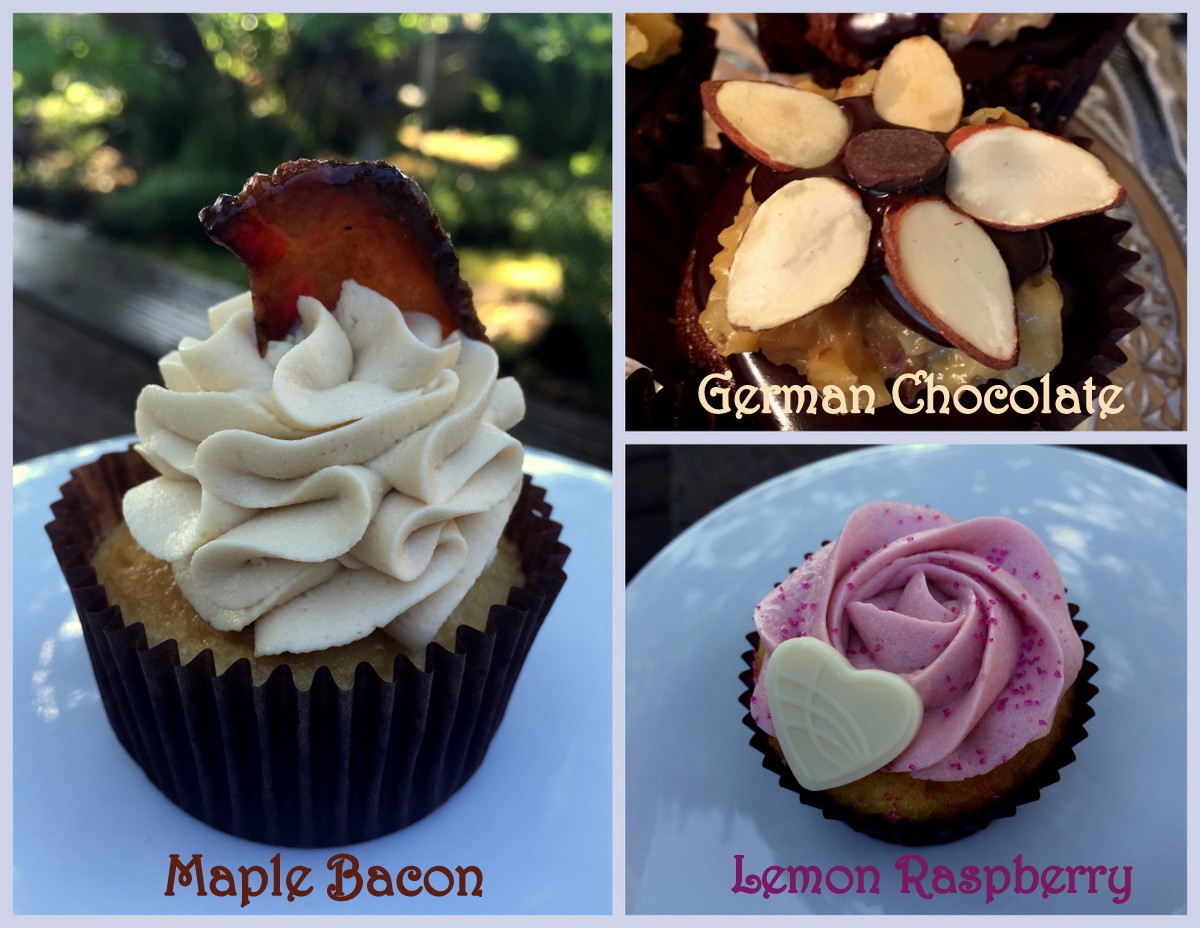
This weekend I had the pleasure of making cupcakes for a wedding reception. It was for an order that had been placed long before I knew I was pregnant, and it was for a friend, so I chugged through the back pain and swollen feet and spent the past few days "whipping up" 12+ dozen cupcakes in three yummy flavors. 

Let me introduce you to my new friends:


I never understood the maple bacon craze until now. Mostly because I choose not to eat a whole lot of meat and I haven't had bacon since before bacon became the "in" thing. But, of course I had to try some, you know, for quality control purposes. I candied this bacon and I have to say, I suddenly understand why bacon (especially maple and bacon together) have ended up with a cult-like following. It turns out that Baby is a fan of bacon, especially the bacon that was dipped in the leftover chocolate ganache! 


The cupcakes were beautifully displayed on this lovely dessert table and enjoyed by many. But mostly be me... because, well, I'm pregnant. And of course, I had to taste test these beautiful creatures every step of the way. You know, again, for quality control purposes!

I really enjoy having an edible outlet for my creative side, and honestly, it was nice to have a sizeable project to tackle to get me up and keep me moving. It's been all too easy to succumb to afternoon naps these days!

The best part is, at the beginning of the week I got a genius idea to invite my mom to drive up (from 4 hours away) to help me with these cupcakes, and as payment, she got to take my kids home with her for the next week. I'll let you decide who's getting the best of this deal!

It was a huge blessing to have her help, especially with the dishes. I'm pretty sure I could bake all day long if it weren't for the dishes. And the shopping. And the whole cleaning up after myself thing!

At the moment I'm kicking my feet up, relaxing, ingoring the powdered sugar mess on my floor, and dreaming about the future with my husband, all while the kids are getting fully spoiled at Grammy's.

Oh, and I'm eating leftover cupcakes. It's a tough job, but somebody's gotta do it!  
Friday, April 29, 2016

Carrot Cake Cupcakes with Cinnamon Buttercream Icing

I pulled into my driveway last night after an event at church and suddenly remembered two things:

1.) I had to drop my car of at the mechanic before morning.

2.) I promised my favorite client (my husband) that I would make him some carrot cake cupcakes for a retirement potluck at work along with a couple of individual cupcake boxes for the retirees.

Mind you, this was at 9 o'clock at night.

My husband, being oh-so understanding, drove with me to the shop and then we put the kids to bed and I got started on yet another late night baking adventure.

Honestly though, despite my best intentions, it's just kind of what I do.

Luckily, I'm also in the middle of a delightful show about horses on Netflix and Rob got me some wireless headphones for my Birthday this year, so it's not so rough spending my evenings in the kitchen.

And despite the mess, I enjoy when something beautiful and yummy comes out of my kitchen that ends up being a blessing to others!

Thursday, March 24, 2016

German Chocolate Cupcakes

German chocolate cupcakes. Oh, so delicious!

I didn't know I liked German chocolate until I made these cupcakes. I think the only German chocolate nutty coconut topping I had ever tasted had probably been from a can, or on a cake from the store made from whatever ingredients allow it to have a shelf life of several months. (Seriously, next time you're at the grocery store look at the expiration date on cakes in the bakery. "Fresh" baked cakes can have a shelf life of 3+ months. My cakes and cupcakes have a shelf life of 3 days. I hate to think about what's in a product that allows it to stay "fresh" that long.)

Anyway, I made these for a customer and I absolutely fell in love with this dreamy almond coconut topping. I may or may not have eaten by the spoonful. You know, for quality control purposes...

It's a chocolate cupcake iced with chocolate ganache and topped with a German chocolate filling. A few almond slices and an inverted chocolate chip work together to make a flower that adds the perfect bit of class to this already delicious cupcake!


Sunday, January 3, 2016

The Little Mermaid Cake

Look at this stuff
Isn't it neat?
Wouldn't you think my collection's complete?
Wouldn't you think I'm the girl
The girl who has everything?
Look at this trove
Treasures untold
How many wonders can one cavern hold?
Looking around here you think
Sure, she's got everything
I've got gadgets and gizmos a-plenty
I've got whozits and whatzits galore
You want things of above?
I've got twenty!
But who cares?
No big deal
I want more...

Saturday, June 20, 2015

Red and Black Wedding Cake with Cascading Flowers

IMG_4873

This cake has a 14" chocolate pound cake base with a chocolate ganache buttercream filling, and a 10" and 6" white cake with a cinnamon buttercream filling.

IMG_4860

It is finished with a rustic buttercream icing finish. And can I just say, it weighed a TON. I could hardly twist it, let alone pick it up. I’m so grateful for my husband’s willingness to be my personal cake delivery man. I quite literally could not have done this one without him!

IMG_4919

And this is me with one of my creations. I sure have enjoyed learning a little bit more with each cake I’ve done. I can’t imagine how people learned all the ins and outs and tips and tricks before blogs, online forums and Youtube. I still find myself Googling a great deal of questions during each of my baking sessions. I am grateful that so many people take the time to share their knowledge with the rest of us. Maybe someday I’ll get some “official” training, but in the mean time I’m enjoying trying my hand at different techniques as I continue to learn the fine art of baking from others via the world wide web.

If you’re a baker, what resources have you found to be most helpful in your own learning process? I’m always open to learning new things!  

Monday, December 1, 2014

Super Simple MINECRAFT Cake

IMG_3703

My son, Titus, loves Minecraft. He talks about it. A LOT. Creeper-this. Endermen-that. Steve and mines and iron and diamond and pic-axes and…

IMG_3690My head nearly explodes every time he starts in on the newest thing he learned, or built, or mined, or… whatever! But I love him. More than life itself. So, in all of my spare time (read: I have no spare time these days), I wanted to make him a Minecraft cake for his 9th Birthday without spending a great deal of time on it. 

It just so happens that he had no Minecraft toys prior to this weekend. Minecraft toys (when properly washed) make great cake toppers. So I did what any good mom short on time would do. I gave him his gifts from us early, washed ‘em up and stuck them in the cake!

IMG_3704IMG_3706IMG_3708

Lest you think one can just plop toys on a cake, and call it a day, however… you must first consult the Minecraft master. Because soon you will find out that you can only mine iron (or is it diamond?) on certain levels. And that block of iron needs to be set into the cake. And Steve must come at it from above. And the creeper needs to fall just so with whatever that black thing is, landing right in front of him. And the little brown guy needs to be right next to Steve for some unknown reason. And it’s okay to have more than one Steve on the same cake because everybody’s Steve. And the witch and the mushroom and the gold…

IMG_3705

IMG_3707IMG_3694

Oh, the gold! The kids got so excited when they saw a few gold coins sticking out of the cake. Little did they know, I had washed up one for each of them to stick in the middle of their slice of cake. Forget sugary party-favors and cheap toys. Gold dollar coins are where it’s at!

Tutorial

This isn’t step-by-step and it doesn’t include pictures of the cake making in process, but if you’re trying to figure out how to make one of these for your own little munchkin, let me give you a few tips.

1. Bake 3 layers of chocolate cake (I used two boxes) in square pans. Let them cool, then use a serrated knife to cut off any cake doming that may have formed while baking. Do as I say, not as I do. I got lazy on this cake and didn’t think it would be a big deal to leave the small domes on the cake. I was so very wrong. When stacking so many layers on one another it really is best for each layer to be perfectly flat. I’ve made enough cakes I should have known better. I did my best to fill in gaps with extra icing, but simply making the squares flat to begin with would have saved me a IMG_3696world of trouble and the cake would have been more ‘square’. 

(Make sure you line the pan with greased tin foil so you can easily lift the whole square out of the pan and onto a flat surface to finish cooling. Also, make sure the flat-side is down to prevent cracking.)

2. Make 1.5 batches of the basic Wilton buttercream recipe and add cocoa powder to about half of the icing to turn it into chocolate.

The other half I tinted green, until my son approved of the “perfect” color.

3. Next, put one layer of cake on the bottom and cover it with chocolate butter cream.

4. Then cut a small square out of the edge of the next layer before placing it on top of the first layer. Save the little square for later as it will soon become the top layer.

5. Place chocolate buttercream on top of the second layer where the third layer will go. It acts as a nice “glue” to hold the IMG_3703-002whole thing together.

5. Next, cut the third layer into a smaller square, so the corner just perfectly meets up with the corner of the missing piece (where Steve is pictured on the bottom level). If you get it cut wrong you can just keep adding pieces with more frosting acting as glue. Perfection is not the name of the game with this perfectly imperfect cake! Frost that layer where the top little square will go. 

6. Add the final small square on the top corner to make the 4th and final cake layer.

7. Crumble some of the cake pieces you’ve cut away and smash the small pieces up against the wet frosting that is between the layers on the sides. I just left the crumble pieces on the tray for authenticity though my son has informed me that the blocks stay in tact so it is, in fact, unrealistic for their to be “dirt” pieces around the base. But, I didn’t want to clean it up and I thought it looked cool. Titus said it would be okay if I left it that way even though it isn’t realistic. So I did!

8. Use a wilton “grass” tip to pipe the grass on top of the layers.

9. Finally, let your smarter-than-you-Minecraft-obsessed child show you exactly where to place all of the special toys to make the “perfect” Minecraft cake. Or better yet, have him wash up and do it himself. With your gentle guidance of course… everything has to be properly spaced and all!

IMG_3712

10. Let your super-excited kid give you hug after hug after hug for his “awesome” cake. And make him pose for pictures with your combined creation. 

IMG_3748

I love that he helped make this cake. I think he will remember this one for a very long time!

I might make cute cakes, but I make even cuter kids. Look at this handsome guy! It’s hard to believe he’s already 9 years-old. Yes, friends, that is half-way to adulthood.

I have more years of mothering behind me than I do before me.

I only have a few more years until talks of Minecraft, Lego and Starwars turn into talks about music, girls and who-knows-what-else.

Lord, let me treasure these days, for I know how fleeting they are. Thank you for giving me the gift of motherhood.

Thanks for giving me this amazing son. I am so grateful for this precious gift! He is everything I probably never would have thought to ask for in a son.

But clearly, you know best. I look forward to seeing him fulfill what you created him to do but more importantly, to become who you created him to be!

Friday, November 21, 2014

Autumn (and Disney!) Inspired Rustic Wedding Cake

IMG_3555-001

This weekend I had the pleasure of making a wedding cake for a sweet young lady, Kayla and her (now) husband, Dustin. I got to know her as a teenager in our youth group. I’m pretty sure she’s still 16—only now she has a husband and a masters degree. Which, clearly is impossible, because I was her youth leader just a few days ago. Ahem…

The wedding was adorable. It had a gorgeous vintage feel with subtle (and not-so-subtle) hints of Disney everywhere. I thought I was a Disney fan—I don’t come anywhere close to being as big of a fan as she is! I should’ve taken more pictures, though truly, you would have had to have been there to really feel the magic. It was as if a little bit of pixie dust had been sprinkled throughout!

They had a gorgeous dessert bar and decorations in every nook and cranny that looked like they jumped straight off a Pinterest board. Every little detail was perfectly tended to. And the bride. Oh. my. She looked radiant! I hope this day lived up to every fairy tale hope and dream she’s ever imagined!

While she was putting the finishing touches on her hair and make-up, I was putting the finishing touches on this cake. I spent Friday baking, splitting, filling and stacking. Luckily, I had a friend, Phyllis, over to help me get through the tedious parts (and she did my dishes!). Friday night I frosted the cake and Saturday morning I assembled the cake on site and added the raffia with the help of my professional driver and schlepper (aka: Rob , my husband) and my baking assistant (aka: Leeann, my 11 year-old daughter).

This adorable cake topper was ordered off of ETSY by the bride months in advance, but through a series of unfortunate events it didn’t end up arriving until THE DAY OF THE WEDDING. I woke up on Saturday morning trying to figure out a plan B for the cake topper. I was trying to decide if there was any way I could manage to sculpt something similar out of clay in a few short hours. I think I could have recreated the Disney pumpkins but the replica of this couple’s dogs would have been far more difficult to perfect in a few short hours.  Luckily though, the topper showed up at the post office just before I was about to head off to Hobby Lobby to see what I could come up with.

Which is great, because I also had someone coming to look at my house that’s on the market that afternoon. We “cleaned up” in about a half an hour by literally throwing all of my baking things into the dishwasher, just to get it off the counter and out of the way. I am constantly amazed by how much of a mess I manage to make when I’m decorating a cake. Luckily, like I said above, my whole family pitches in to help when I’m in baking mode!

In case you are finding yourself here from Pinterest-land and you’re wanting cake details, here are a few specs for you:

The top tier is 8”, the middle tier is 12”  and the bottom tier is 16”.  Each tier is 5” tall. An 18” cake board is supporting the cake. The raffia is twisted upon itself and fastened together with shorter pieces of raffia used to create the bows in the front of the cake. The rustic icing finish was done free hand with a spatula.

If you are new to wedding-cake making, let me encourage you to make sure you support and stack the layers well. There are a lot of tutorials out there that show you how to use dowels and cake boards to make sure your cake doesn’t fall apart. As a wedding coordinator and photographer I’ve seen enough wedding cakes tilt, sink, split or crumble to offer you this unsolicited piece of advice!

I am already looking forward to trying my hand at another wedding cake. It’s a bit stressful, but the end result makes all the work well worth it! It is my prayer that Kayla and Dustin enjoy life together to infinity and beyond. May they enjoy married life—the wildest ride in the wilderness. May all their dreams come true and may they live happily ever after! Thanks for including me in your special day!

Wednesday, September 10, 2014

One Step Toward a Dream

All our dreams can come true if we have the courage to pursue them. ~Walt Disney

I dropped the kids off at school today. It’s the first day in months and months and months that Rob’s been at work, the kids have been at school and I’ve been home with nothing to do. No work. No plans. No obligations. Nothing.

For the first time in what feels like forever, I have the freedom to think. To breathe. To relax.

To dream.

One in particular dream has been swirling around in my mind lately. Any time my mind has time to wander, it seems to wander to this particular place.

IMG_2291IMG_2282IMG_2295-001

My bakery

This dream is still its infancy stage, but my dream is a dream none-the-less.

On my way back from dropping my kids off at school this morning I decided to take a detour. There’s a store closing in downtown Albany that I’ve driven by many times each week. I decided to stop by today and got a chance to talk with the owner and poke around the building. It would make a wonderful location for a bakery, in my humble opinion.

By the time I left, my brain was already arranging furniture and designing my commercial kitchen.

But alas, I recognize this dream is still far off. I’m sure this particular building will be rented by a new tenant before I have another free day to even think about turning my dream into reality. But still, I think taking the time to let myself dream a little is further solidifying my desire to open up a bakery someday.

Slowly but surely I think I shall develop a plan. I shall do some research. I shall let my mind wander. 

Here is a list of things I can think of off the top of my head that it will take to make my dream into a reality:

  • A dream

  • Retail space

  • Bakery name

  • Business plan

  • Website

  • A business license

  • Price lists

  • Capitol for start up costs

  • Commercial kitchen

  • Logo

  • Décor

  • Furnishings

  • Display cases

  • A bazillion incidentals that all cost money, like a cash register, coffee supplies, pans, boxes, shelving, displays, etc. 

Well, at least I got one thing crossed off the list. It’s the most important thing, if you ask me. Okay, maybe not the most important thing, but it’s an important place to start, for sure!

As for the rest of those things—unless the people who can make those things happen accept payment in the form of cupcakes and scones, well… the rest might still have to wait a while.

But today, I’m going to take the first step. I’m going to put aside the $30 I made from making and delivering 4 dozen petite maple pecan scones this week. I’m going to see what I can do about using that $30 to make $60. Then I will see what I can do about making that $60 turn into $120… until someday I have enough set aside to fund my dream.

Cupcakes anyone?

Friday, July 4, 2014

Pink Ombre Wedding Cake—Tips, Tricks and Shortcuts

IMG_1081As much as I love baking sweet treats and making beautiful (and yummy!) cakes and cupcakes, I’ve always steered clear of saying yes to making wedding cakes. Something about the pressure of doing a wedding cake has always frightened me. It’s not like you can just quickly whip up a new one if something goes wrong, ya know?

But, when I received a request to make a wedding cake for a former foster kiddo of ours, I knew that it was time to learn the art of filling, torting, stacking, refrigerating, packaging, transporting and assembling on site. All things I was a bit afraid of before this—simply because I’d never done it.

Thanks to You Tube, and a few significant time-saving tips and tricks, I was able to create a special cake that the bride loved and if I’m being honest, I’m pretty proud of the way it turned out!

I wouldn’t say it was easy, but it wasn’t nearly as complicated or troublesome as I had imagined it to be in my head. And I learned so many things this time around that I can honestly say I’m looking forward to trying another wedding cake at some point in the future!

IMG_1109

Renee is one of the few foster kids I’ve written about here on my blog. You can read about her in my post She’s Gonna Make It (The Blessings of Being a Foster Parent).

I was delighted to get to be a part of her very special day. She reminded me so much of myself when I got married at her age—the ripe old age of 19! At the end of the day she just wanted to be married to the love of her life and the rest of the details were just… well… details.

So she gave me some general thoughts on what kind of cake she wanted but gave me the freedom to embellish it as I saw fit. She wasn’t picky (which certainly helped my stress level), she was just grateful for whatever I could come up with.

And I was grateful to help make her special day a little more special! In fact, I was also able to rope in a few friends (an officiant, a sound guy, a D.J., some flowers for centerpieces and a wonderful woman who helped make them) who were happy to be a blessing to this young college student and her husband who is currently serving in the Army.

In addition to making the cake and the centerpieces, I also coordinated this wedding. That was probably the most stressful part because this was an outdoor wedding and the forecast for the day was rain. But, I honestly saw the grace of God pour down along with the rain because there was just enough time for the ceremony before the rain came pouring back down. Then there was just enough time for pictures. More rain. Then there was just enough time for the dances. More rain. Then there was just enough time to cut the cake before another downpour started.

Here are the bride and groom on their very special day.

IMG_1159

They sure do make the cake look good, don’t they?


Tips and Tricks


  • This video was very instrumental in teaching me how to properly stack and support the cake layers. I followed these instructions to a “T”.
  • My cake layers are 10”, 8” and 6” double layer cakes, each cut in half and filled with raspberry filling.
  • I used Wilton’s Basic Buttercream recipe. I did one double batch for the crumb coat and 3 double batches for the cake itself, as well as an additional 6” cake topper for their wedding anniversary.
  • To achieve a gradient look with the frosting, I used a round tip to pipe one color at a time, starting from the top center and working my way down in a circular motion. I used the lightest color first then I tinted the whole batch of icing a slightly darker color. I repeated this process, piping a color, texturing it, then tinting the next color, adding it right back into the bag I just used and repeating the process again.
  • To achieve the textured look you see here, I use a top-secret expensive tool. My fingers. Clean, of course. Once I piped a layer of frosting on I used my index and/or middle finger to create this messy texture. Ideally, you would do this with a cake decorating spinny plate thingy. I’m sure there’s a technical term, I just don’t know what it is. Basically, you almost just keep your fingers still and turn the plate, dragging your fingers through the icing. Slowly drop your fingers once you return to the place you started to do the next layer. Stop every so often and scrape the excess frosting that has accumulated up your fingers into a small bowl to use later to fix accidents, glue layers together and to cover the transition between layers once the cake is assembled.  

IMG_1088


Shortcuts

If you are new to cake making, here are some ways you can lower your stress level by taking some shortcuts.

  • Feel free to embellish your cake with silk flowers or fresh (edible) flowers instead of frosting or IMG_1089fondant flowers. The ones pictured here cost me a total of $2 from the Dollar Store.
  • Use some cool beads, ribbon, candy or other embellishments instead of frosting between layers. I actually got these ones from the upholstery section at Hobby Lobby and just washed and dried them before I placed them on the cake over a fresh coat of icing to seal the layers together. The fresh icing makes a perfect glue to hold these beads in place.
  • Instead of fussing with making fruit or chocolate filling when you’re already stressed out about all of the other aspects of building a wedding cake, just see if you can buy some from a local bakery. I called my mom in a panic over raspberry filling and she gave me this priceless suggestion. Picking up some cake and donut filling from my local Mega Foods ran me $10. It’s cost in saving my sanity: Priceless. 
  • I almost don’t want to confess suggest this, but for the sake of transparency and “shortcut tutorial” fodder, you could always use boxed cake mix. I “ahem” may or may not owe the success of this cake’s tastiness to my friend Betty. Betty Crocker.

True story: Some friends of ours were providing music for the wedding and they were raving about this being “seriously the best cake they ever tasted”. I just grinned and tried to keep my mouth shut (my husband encourages me just to say “thank you” and let it be). But I couldn’t help but confess my secret. They were genuinely surprised. And now I’m confessing my secret to the world—he would be mortified! Sorry love! 

And this is the real-life part of the Real Life Pastor’s Wife. I make gargantuan messes when I bake. As in, my whole kitchen is layered in a fine layer of powdered sugar. Frosting is everywhere and cake paraphernalia can be found strewn throughout my kitchen and dining room for days.

IMG_2312

This is what I woke up to the next morning, my KitchenAid mixer, just as I left it. Unfortunately no cleaning elves invaded my kitchen in the middle of the night. *Note*, don’t leave pink frosting sitting over night on your white counters. Trust me. Not that I would know all about how it stains your counters or anything. 

IMG_1125

But the end result of seeing this cake come together, and of getting these two wonderful young people married off, was well-worth every bit of the mess and stress. Mission accomplished!

Sunday, June 8, 2014

Dr. Seuss Themed Giant Cupcake Bouquet *Graduation Style*

IMG_1058

Is there any better way to display several dozen cupcakes?

IMG_1008

This was a graduation “cake” request in pink, turquoise and lime green. I was quite pleased with how it turned out. I really liked these colors together.

IMG_1033

I enjoyed getting to use my silhouette cameo for a few parts of this cake, including this fitting quote from Dr. Seuss.

I was also able to cut out these cute little flower pieces to perfectly fit on crazy straws that I cut down to size.

IMG_1037


I was going for somewhat of a whimsical theme. If you want more details on how I constructed this giant cupcake bouquet, you can see this post for a rough idea of how it’s done. This particular one requires a great deal of tissue paper, crazy straws, round toothpicks and a cutting machine. However, I was just introduced to Hobby Lobby which opened in my city this weekend. I found tons and tons of ideas that would create a similar look without the machine. Think ting ting, floral sprays, glitter balls, butterflies, lollipops, etc. Really, I must have found a zillion things at Hobby Lobby that could have worked to embellish a cupcake bouquet like this. I’m not sure I’m exaggerating! <------ Okay, maybe just a tad…


IMG_1048

I used this buttercream frosting, and made the roses with a 2D tip. I have officially decided I prefer this tip to the 1M, though they both work just fine.

Did I mention we just got a Hobby Lobby? They have so many cake decorating supplies that I am beside myself. I’m sure there will be another Giant Cupcake Bouquet in my future.

They have fake flower embellishments in every color you could imagine.

They have myriads of cupcake liner colors.

And icing colors.

And pretty things that sparkle. Lots of pretty things that sparkle.

I told Rob he could pretty much buy me anything in that store and I’ll probably love it. There will be no need for him to ever go to another store to purchase gifts for me.

The signs.

The stamps.

The party supplies.

The decorations.

I’m seriously so in love. With a store. Which is pathetic.

But I own it. Not the store, my pathetic-ness.

Could you imagine if I actually OWNED the store?

It’s a beautiful thought, but for your sake one that I will not expound upon.

I need to get going and get back to reality, unfortunately. 

_______________________________________________________________________________________________

Feel free to click here to see more cakes and cupcake bouquet ideas. 

Friday, April 18, 2014

Lemon Cupcakes

IMG_0783

Some posts simply don’t need many words.

lemon cupcakes

This is one of those posts.

IMG_0686

Lemon Cupcakes. Yummmmmmy!


The Nitty Gritty:

I used the lemon buttercream from the Wilton website

I may or may not have used boxed cake mix a secret recipe for the cake itself

The lemon peel garnish is grated lemon peel tossed in sugar

I used a combination of tips #124, #97, 2D, a small star and small round tip to create the different icing techniques you see here. The flower technique can also be found on the Wilton site.

The yellow candy center is none other than lemonheads. Fun, huh?

Wednesday, April 16, 2014

Yellow Cupcake Roses with Red Tips

IMG_0662IMG_0648IMG_0608

IMG_0656


This bouquet of yellow roses with red tips was created for an Options Pregnancy Resource Center volunteer appreciation banquet. It started out as plain yellow roses, but I decided to try hand painting the tips with a pinkish-red food coloring.

I used a basic buttercream icing and Wilton 1M tip (2D works too!) to create the roses. After I piped the roses I refrigerated the cupcakes to let the icing stiffen enough to paint the tips.

For a rough tutorial on putting a bouquet like this together, see this post.

The embellishments are a combination of tissue paper and fake flowers. I happen to have found all of the necessary supplies to make this bouquet at my local Wal-Mart.

After the fact I found this video tutorial which seems like a much easier way to accomplish a similar look: https://www.youtube.com/watch?v=_8SYhPFLYEA. Live and learn I guess! This video will also show you how to create the rose technique itself. You’ll be amazed at how simple it actually is!